

How To Enable Front Audio Jack In Windows 8
Z7_3054ICK0KGTE30AQO5O3KA30N0
HP Desktop PCs - No Sound From the Forepart Sound Port (Windows 8, Windows 7, Vista)
This document applies to HP desktop computers with Windows 8, Windows 7, and Windows Vista.
When you plug in speakers to the green audio port on the back of your reckoner, sound tin exist heard from the speakers. However, when you plug in your speaker or headphones to the light-green audio jack on the forepart of the computer, sound cannot be heard. When this happens, but restarting the computer can sometimes fix this problem.
If the trouble continues, even after the computer has been restarted, utilize the following steps to fix the problem.
Step ane: Uninstall the original audio commuter
Uninstall the sound driver from Device Manager using the following steps:
-
In Windows, search for and open Device Managing director.
-
Double-click Sound, video and game controllers.
Figure : Sound device in Device Manager
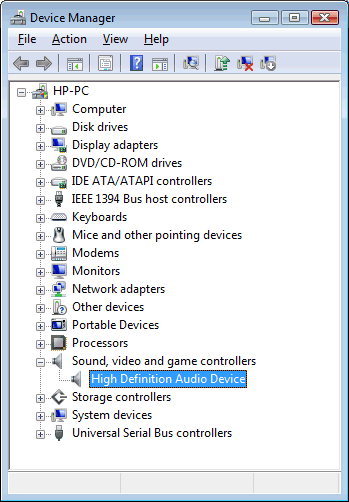
-
Correct-click the name of the sound device listed under Audio, video and game controllers.
-
Select Uninstall and then follow the on-screen instructions to uninstall the audio device.
-
Exam the front port by plugging headphones into the lime green audio port on the front of the estimator and playing music.
If sound bug persist, go along to the adjacent footstep.
Step ii: Reinstall the original sound commuter
Reinstall the original audio commuter using the following steps:
-
Connect to the Internet.
-
Reinstall the audio driver using one of the post-obit methods:
Windows 8 and Windows vii
-
Search for and open Recovery Director.
If prompted for an administrator password or confirmation, type the password or provide confirmation. If prompted by User Business relationship Control to allow the plan to make changes to the computer, click Yep.
-
Nether I need help immediately, click Hardware Driver Reinstallation.
Figure : Recovery Director: Hardware Driver Reinstallation

-
On the Hardware Commuter Reinstallation screen, click Next.
-
Select the audio driver you desire to reinstall from the list of factory installed drivers; for example, Realtek High Definition Audio or SoundMax ADI Audio. Then click Next.
If the driver you want to reinstall is not listed, select the checkbox adjacent to The driver is not in the list, and and so click Adjacent. Follow the onscreen instructions.
Effigy : Selecting from the list of factory installed drivers

Recovery Manager reinstalls the commuter.
-
Later on the driver installation is consummate, click Finish to restart the calculator.
Windows Vista
-
Search for and open Recovery Director.
-
At the Welcome window, click the Avant-garde button.
-
Select Reinstall hardware drivers that came with your calculator.
-
Click Next two times and select the name of the sound hardware that came with your computer. For example, Realtek Loftier Definition Audio or SoundMax ADI Audio.
-
Click Side by side.
-
Read and answer to the on-screen instructions to install the audio commuter.
-
After the sound device has been reinstalled, restart the figurer.
-
-
Test the front port by plugging headphones into the lime green audio port on the front of the estimator and playing music.
If sound bug persist, continue to the next step.
Step 3: Disable jack detection in Realtek Audio Managing director
If your computer has Realtek Sound Manager, y'all might be able to ready this problem by disabling jack detection from the Realtek Sound Manager software.
If your computer does non have Realtek Sound Manager, skip this pace.
-
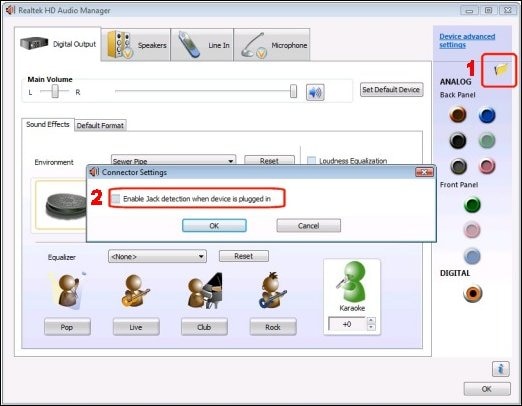
Double-click the Realtek Audio Manager icon in the Notification area side by side to the clock, and and so click Sound Manager.
Figure : Opening Audio Manager

-
In the Realtek Audio Director, click the Connector Settings icon (the yellow folder on the right). And then remove the choice from Enable Jack detection when device is plugged in.
-
Connector settings icon
-
Enable Jack detection
Figure : Disabling jack detection
-
-
Click OK to save the setting.
You lot should now exist able to hear sound from the front audio jack. If not, proceed to the adjacent footstep.
Step 4: Bank check internal cables
Check the wiring within the computer to make sure the front end panel cables are connected to the motherboard.
-
Plough off the calculator and unplug the ability cable.
-
Remove the side panel.
note:
For more than information on removing the side panel and reseating the cables on the motherboard, search for the Maintenance and Service Guide for your computer.
-
Follow the wires that come from the front inside of the case to the connexion on the motherboard.
-
If it is obvious that a cablevision is not fully seated into its socket on the motherboard, press the end of the cable fully onto the pins on the motherboard.
-
If a wire is disconnected, it might be difficult finding where it connects. to Reading the small-scale messages on the motherboard next to pins that are not connected might provide a clue to the location of the connection. F_Panel, F_Audio, FP_Audio, and F_Line-in are examples of labels on the motherboard for pins that connect to front end panel. You can besides refer to the motherboard layout diagram on your computer's motherboard specification. The online motherboard specification support document tin can be plant on your PC Support folio in the Product Information category.
-
Later on checking the wiring, replace the side console, plug in power and plough on the computer.
You should now be able to hear sound from the front audio jack. If not, the sound hardware might not be able to switch the audio signal to the front ports and the figurer might require service to replace the sound menu or motherboard.
Source: https://support.hp.com/in-en/document/c01695367
Posted by: floresloguithat36.blogspot.com
0 Response to "How To Enable Front Audio Jack In Windows 8"
Post a Comment